
Direct answer: RepairBench OS is a browser-local operating workspace for tracking small-engine repair customers, machines, jobs, estimates, parts, labor, invoices, payments, comebacks, and management reports. It is a good fit for a US shop that wants a private, offline-first record system and owner dashboard. It does not connect to banks, accounting platforms, suppliers, customers, or cloud sync in the verified edition. Your shop must review the figures, protect the browser and device, and keep its own backups.
Home · Nexaly Planner product index · RepairBench OS product page · All product guides
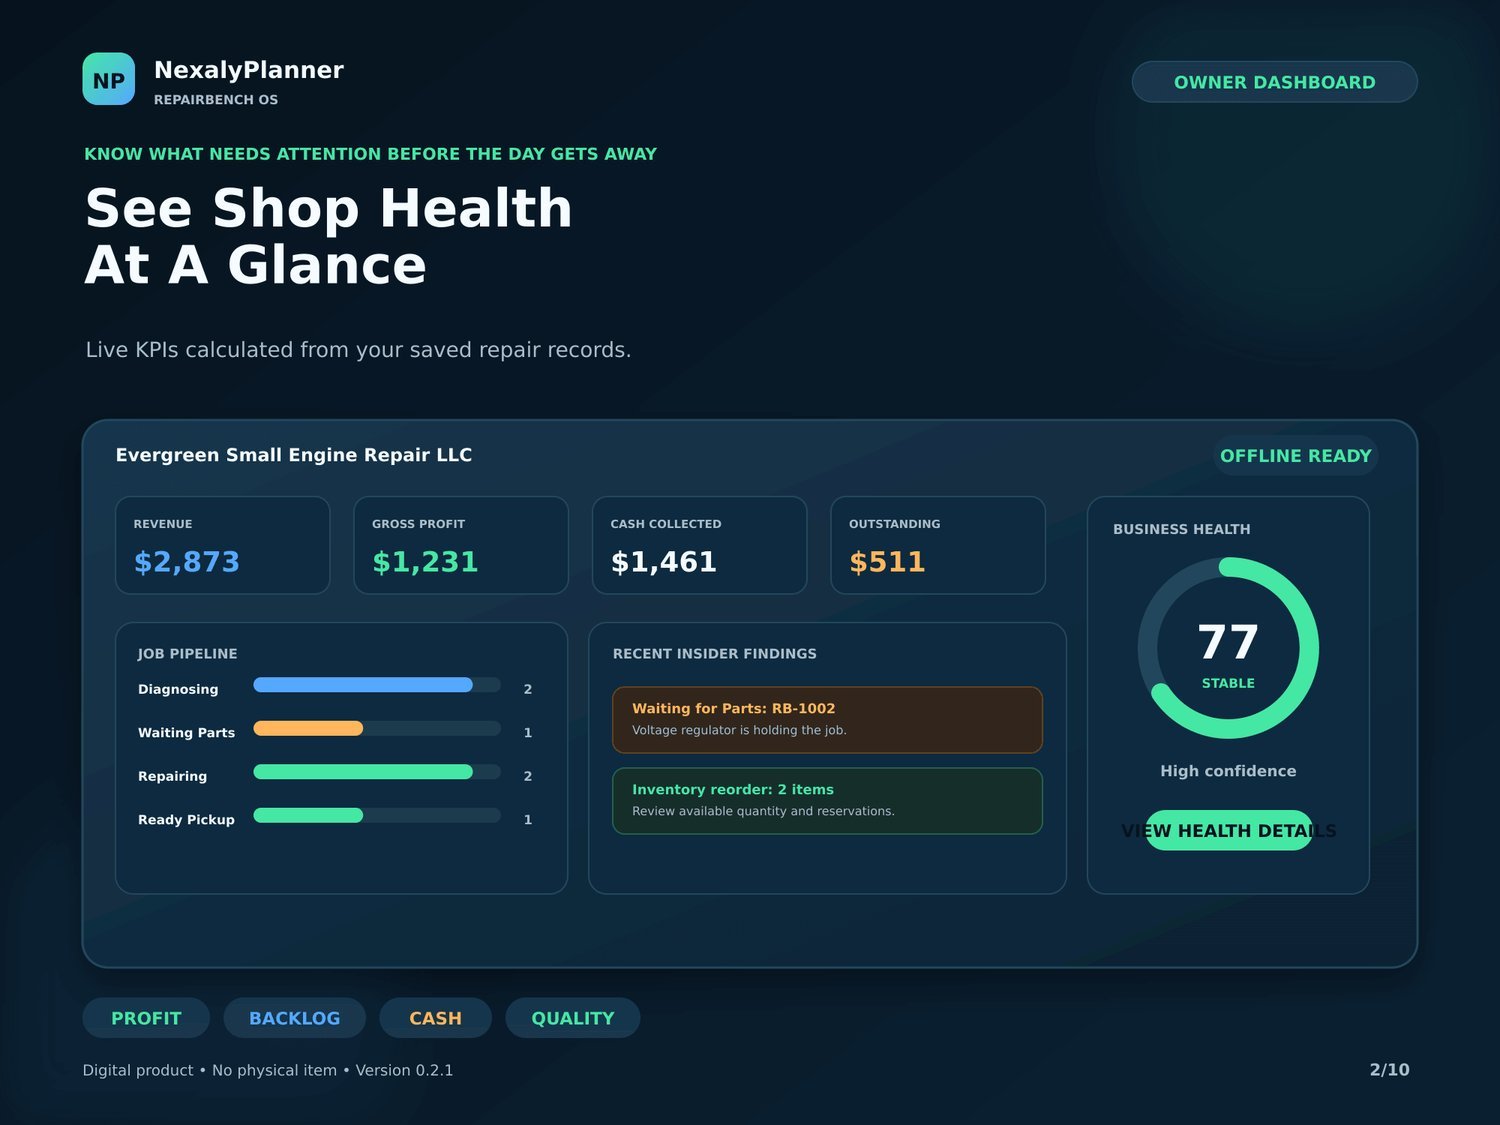
Baseline Owner Dashboard captured from RepairBench OS v0.2. The empty-state view is useful for orientation: it shows the local KPI cards, job pipeline, Insider findings area, and attention counters before shop records are entered.
What RepairBench OS does—and what it does not do
RepairBench OS keeps a repair shop’s operational records in the current browser. The sidebar is labeled Offline & private, with the message Your records stay in this browser. The application opens through a short “Starting RepairBench OS” screen and then loads the workspace; the verified source does not show an initial password gate or onboarding-only lock. A new workspace begins with no recorded jobs, so the dashboard can show Insufficient data until you enter enough useful records.
The product is designed around the repair lifecycle rather than generic bookkeeping. A customer can have one or more machines. A machine can have a repair history. A repair job moves through defined statuses, and the job record can carry the complaint, diagnosis, estimate, approval evidence, parts cost, billed parts, labor hours, billing rate, internal labor cost, technician, invoice total, testing state, and comeback flag. Those records feed the dashboard, local rule-based Insider analysis, financial-position calculations, reports, and aging views.
The financial screens are management views, not certified accounting or tax reporting. Financial Position explicitly describes its P&L as “Not certified accounting or tax advice.” Use a qualified bookkeeper, accountant, tax professional, or attorney for official records and compliance decisions. The product also does not diagnose machines automatically, approve estimates for customers, order parts, collect payments, send messages, or take any outside action.
Quick start: your first shop session
- Open the HTML product in a current browser. Wait for the startup screen to finish. If it reports that RepairBench OS could not start, refresh once and use the troubleshooting section below.
- Open Settings. Enter the shop’s business name, owner or manager, address, city, state, ZIP code, country, phone, email, website, and optional business registration or EIN field. These details are used on branded reports and printed work orders.
- Choose USD in Settings. The verified currency choices are USD, CAD, GBP, EUR, AUD, AED, and PKR. Choose the currency that matches the records you intend to enter; this guide assumes US dollars.
- Choose the working language and theme. The language selector supports EN, AR, PT, ES, NL, FR, and IT. The sun button switches the visual theme.
- Decide whether to load the USA demo. Load USA Demo Data adds fictional records, including an example shop profile. It is useful for learning the screens, but it is not your business data. Use Clean reset only after checking that you do not need the current local records.
- Create the first customer. In Customers, select + Add customer and record the name, phone, email, communication preference, and notes.
- Create the customer’s machine. In Machines, choose + Add machine, select the customer, choose a category, and record brand, model, serial number, engine details, and condition notes.
- Open a repair job. Select + New Job from the header or Repair Jobs. Select the customer and machine, record the complaint, choose Intake, and enter the promised date and priority if known.
- Add the estimate and work details as they become known. Record the diagnosis, approval status and evidence note, estimate total, parts cost and price, labor hours, billing rate, internal cost rate, technician, and invoice total.
- Save a backup before entering a full week of work. In Backup & Restore, use Download backup. Store the JSON file outside the browser, ideally in more than one safe location.
Complete menu and screen map
| Menu or screen | What it records or shows | When to use it |
|---|---|---|
| Owner Dashboard | Revenue, gross profit, cash collected, outstanding balances, business health, job workflow counts, recent Insider findings, and queue counters | Start and end the day; review shop-wide attention |
| Insider AI Feed | Local rule-based findings about job profit, backlog, payments, quality, incomplete records, parts, and priorities | Investigate what needs attention without changing records |
| Customers | Customer identity, contact details, communication preference, notes, and job count | Intake and service-history lookup |
| Machines | Equipment category, brand/model, serial, owner, engine details, condition notes, and job count | Identify the unit accurately before work begins |
| Repair Jobs | Job number, customer/machine, status, age, invoice total, margin, complaint, diagnosis, estimate, labor, parts, testing, and comeback flag | Manage every repair from intake to collection |
| Estimates & Approvals | Estimate value, approval status, approved date, and evidence note | Check whether authorization is documented |
| Parts Inventory | Part number, description, supplier, location, on-hand, reserved, available, unit cost, selling price, and reorder status | Check stock and set reorder thresholds |
| Purchase Requirements | System-generated reorder requirements based on available quantity and reorder point | Review suggested replenishment; it is not an automatic purchase order |
| Labor & Technicians | Jobs, hours, and labor contribution grouped by technician | Review labor utilization and contribution |
| Invoices & Payments | Invoice/job, customer, total, paid amount, balance, paid/outstanding status, and payment records | Record cash, card, bank transfer, check, or other payments |
| Warranty / Comebacks | Jobs marked as warranty/comeback, machine, diagnosis, and open/closed status | Review repeat work and service quality |
| Financial Position | Management P&L, parts cost, direct labor, gross profit, operating expenses, cash, receivables, inventory, and ready/uncollected value | Review profitability and operating position |
| Reports | Financial Position, Job Profitability, Repair Pipeline, Receivable Aging, Inventory & Reorder, Customer Directory, Machine Register, Technician Performance, and Warranty / Comebacks | Print, save, or export management views |
| Backup & Restore | Complete local JSON archive and validated replacement restore | Protect or move a local workspace |
| Settings | Business profile, branding, logo, currency, language, theme, demo data, and clean reset | Configure the shop and report identity |
Set up the shop identity, privacy, and local preferences
Open Settings before creating operational records. The required field is Business name. The form also includes Owner / manager name, Business registration / EIN, street address, city, state/region, ZIP/postal code, country, phone, email, website, and a business logo upload. A logo must be PNG, JPG, or WebP and no larger than 1 MB. Use Remove logo if a stored logo should no longer appear on reports.
The shop identity appears below the NexalyPlanner master brand on saved, printed, Word, and Excel reports. It also appears on printed or PDF work orders. That branding does not mean the document is a tax invoice or a legally sufficient record in every jurisdiction; review the output before using it officially.
Set Currency to USD for a US shop. Set Language in the Settings form or with the header selector. Arabic also changes the document direction to right-to-left. The sun button changes between the dark and light visual themes. These preferences are stored with the local workspace.
The local model is a privacy advantage and a responsibility. Browser storage is not the same as cloud backup. Anyone with access to the browser profile or device may be able to access the workspace, and clearing browser data can remove it. Use the device’s normal operating-system protections, account controls, and shop procedures. RepairBench OS does not provide verified cloud synchronization, multi-user permissions, bank security, or external identity management.
Use each feature in the actual repair workflow
1. Customers: create a dependable customer record
- Open Customers and select + Add customer.
- Enter the required Name. Add Phone, Email, and a Communication preference of Phone, SMS, Email, or WhatsApp.
- Add useful Notes, such as “Call after diagnosis” or “Prefers text before parts are ordered.” Do not put unnecessary sensitive information in free-text notes.
- Select Save. Use the table’s Edit action when a phone number, email address, preference, or note changes.
The list shows the customer’s phone, email, preference, and number of associated jobs. Customer records are not a messaging system; the preference is a local reference for your staff.
2. Machines: identify the unit before diagnosing it
- Open Machines and select + Add machine.
- Select the customer and a required category: Lawnmower, Generator, Chainsaw, ATV, Tractor, Trimmer, Blower, or Other.
- Enter Brand, Model, Serial number, and Engine details where available.
- Record Condition notes, including visible damage or missing components.
- Select Save and confirm the serial and owner before opening the job.
The Machine Register report marks missing serial numbers. A serial number is not automatically verified against a manufacturer database. Treat it as shop-entered identification and inspect the physical unit.
3. Repair Jobs: run intake through collection
Open Repair Jobs or press + New Job. RepairBench requires an existing customer and machine; if either is missing, the application routes you to create it first. The job form assigns a read-only number such as RB-1001 and supports these statuses: Intake, Diagnosing, Waiting for Approval, Waiting for Parts, Repairing, Testing, Ready for Pickup, Collected, and Cancelled.
Record a required Customer complaint in the customer’s words. Add Diagnosis / findings after inspection. Choose Priority—Normal, High, or Urgent—and add a Promised date only when the shop can reasonably support it. Choose Approval as Pending, Approved, Partially Approved, or Rejected, then use Approval evidence note for a concise local record of how approval was documented. The application records an approval date when the saved status is not Pending; this is a timestamp in the local record, not proof of a legally binding authorization.
Enter Estimate total, Parts cost, Parts billed, Labor hours, Billable hourly rate, Internal hourly cost, and Invoice total as the figures become known. Choose or type the Technician, mark Testing checklist complete when your shop’s testing is done, and mark Warranty / comeback job only when the job is a return or warranty review. Save after each meaningful stage change. RepairBench records status history when a job moves between stages.
The Repair Jobs table shows job number, customer/machine, status, age, total, and calculated margin. Selecting the job number opens a detail view with complaint, diagnosis, estimate, invoice, recorded cost, gross profit, and status history. Use Print / Save PDF in that detail view for a branded work order. Allow pop-ups if the browser blocks the print window.
4. Estimates & Approvals: keep authorization visible
Estimates & Approvals lists jobs with an estimate total greater than zero. It shows the job, estimate, approval state, approved date, and evidence note. This screen is a review queue, not an email or e-signature service. Before ordering a non-stock part or starting work outside the approved scope, compare the job record with your shop’s actual customer authorization process.
A practical rule is to leave a job in Waiting for Approval while the local approval evidence is incomplete. After approval, update the job’s approval status and diagnosis or scope as needed. If the customer approves only part of the work, use Partially Approved and keep the excluded work in the note or diagnosis field.
5. Parts Inventory: distinguish on-hand from available
- Open Parts Inventory and select + Add part.
- Enter the part’s Part number and required Description.
- Add Supplier and Location, then record On hand, Reserved, and Reorder point.
- Enter Unit cost and Selling price in USD.
- Save and review the calculated Available quantity, which is on-hand minus reserved.
The status is Reorder when available quantity is at or below the reorder point; otherwise it is Healthy. The application does not verify a supplier, change a supplier’s catalog, or decrement stock automatically from an invoice. Keep the reserved quantity and cost current if your shop uses the dashboard for operational decisions.
6. Purchase Requirements: review, do not auto-order
Purchase Requirements displays parts at or below their reorder point. It shows available quantity, reorder point, supplier, and Suggested order. The suggestion is calculated as twice the reorder point minus available quantity, with a minimum of one. For example, if the reorder point is 4 and available is 1, the suggested order is 7. Treat this as a replenishment prompt, not a purchase order, quote, approval, or supplier commitment. Export the parts CSV if a buyer needs a spreadsheet.
7. Labor & Technicians: use consistent rates
Labor & Technicians groups jobs with recorded labor hours by the technician name. Each card shows jobs, hours, and Labor contribution, calculated from billable labor less internal labor cost. The view is only as consistent as the job records. Use one technician naming convention, enter the internal cost rate deliberately, and review unusual results against time sheets or shop policy. The application does not provide payroll, time-clock, wage compliance, or employee scheduling features in the verified edition.
8. Invoices & Payments: record receivables locally
Invoice rows come from repair jobs with an Invoice total greater than zero. The screen shows the invoice/job number, customer, total, paid, balance, and either Outstanding or Paid. To record a payment, select + Record payment, choose an unpaid invoice/job, enter the amount, choose Cash, Card, Bank transfer, Check, or Other, and add a reference or note.
RepairBench calculates outstanding balances from recorded payments. It does not process cards, connect to a bank, issue a payment receipt through an external service, or reconcile a bank statement. Confirm the actual deposit or tender in your normal shop procedure. Export the payments CSV when a bookkeeper needs the local records.
9. Warranty / Comebacks: flag repeat work for review
Mark Warranty / comeback job in the repair-job form when the return is relevant to service quality. The warranty screen shows total comeback jobs, open comebacks, the machine, diagnosis, and status. An open comeback is any flagged job not marked Collected or Cancelled. Use the diagnosis and status history to review what happened; the product does not determine legal warranty coverage, enforce a warranty policy, or contact a customer.
10. Financial Position: use it as a management view
Financial Position calculates Revenue, recorded direct parts cost, direct labor cost, Gross profit, operating expenses, and Management operating profit. Its position snapshot shows cash collected, customer receivables, inventory value, and ready/uncollected value. Use + Record expense to add a category such as rent, utilities, or tools, an amount, and a note.
The calculations are useful for shop decisions, such as whether a low-margin job needs a pricing review or whether receivables are growing. They are not a substitute for your accounting ledger. Check dates, payment timing, inventory methods, sales tax treatment, refunds, and other accounting rules with your professional adviser.
11. Owner Dashboard and Insider AI Feed: inspect local signals
The dashboard presents four top cards: Revenue, Gross profit, Cash collected, and Outstanding. It also shows a Business Health view with profitability, cash and receivables, throughput, backlog age, service quality, and record completeness. With no meaningful records it shows Insufficient data. The workflow panel counts jobs by status, while the queue shows waiting-for-parts, ready-for-pickup, and reorder alerts.
The Insider AI Feed is labeled private, rule-based shop intelligence. It rechecks affected metrics after saves and performs aging analysis when the application opens. The assistant can answer local questions such as “What should I focus on?”, “Which jobs lose money?”, “What is waiting for parts?”, “Who owes money?”, and questions about shop health or backlog. Its answers read RepairBench records and cannot change financial records. Use the answer as a prompt to inspect the source job, not as an automatic decision.
Worked US example: mower repair from intake to pickup
Assume Lone Star Outdoor Repair LLC in Austin, Texas receives a customer’s 2022 commercial walk-behind mower on September 9, 2026. The customer, Maria Lopez, prefers SMS. The technician notes a hard-start complaint and a damaged pull cord.
On September 9, create Maria Lopez in Customers, select SMS, then create a Lawnmower in Machines. Enter the manufacturer, model, serial number, engine details, and condition notes. Open a job such as RB-1001, set it to Intake, choose High priority, and set a promised date of September 12. Enter: “Starts only after repeated pulls; customer reports stalling under load.”
On September 10, inspection finds a restricted carburetor and worn pull-cord assembly. Update the job to Diagnosing, enter the diagnosis, and set an estimate of $348.00. Record parts cost $62.00, parts billed $95.00, labor hours 2.5, billable hourly rate $85.00, and internal hourly cost $30.00. The proposed invoice total is $307.50 ($95.00 parts plus $212.50 labor). If the agreed estimate includes a diagnostic fee or another line, enter the actual approved total rather than copying this example.
On September 10, after Maria approves the scope by the shop’s normal process, set Approval to Approved, add an approval evidence note such as “Customer approved by SMS; retain conversation per shop policy,” and move the job to Repairing. If the pull-cord assembly is not available, set Waiting for Parts instead. Add the assembly to Parts Inventory with its part number, supplier, location, quantity, cost, and price; Purchase Requirements will show a prompt only if available quantity reaches the reorder point.
On September 11, install the part, complete the carburetor service, and set the job to Testing. Mark Testing checklist complete only after the shop’s actual test is complete. Record any additional findings before setting the job to Ready for Pickup. The dashboard’s ready-for-pickup value and the invoices screen will now expose the customer balance.
On September 12, Maria pays $307.50 by Card. Select + Record payment, choose INV-RB-1001, enter $307.50, select Card, and add “Receipt 1001” as the reference. The invoice row should show Paid and a $0 balance. Set the job to Collected after the unit leaves the shop. If Maria returns with the same issue on September 18, create or update the return record according to your shop process, mark the relevant job Warranty / comeback job, and review it in Warranty / Comebacks. The example illustrates record flow only; it does not establish warranty terms, tax treatment, or a required repair procedure.
Daily and weekly shop routines
Daily opening
Start on Owner Dashboard. Review open jobs, jobs older than 14 days, Waiting for Approval, Waiting for Parts, Ready for Pickup, reorder alerts, outstanding balances, and recent Insider findings. Open the underlying job rather than acting only on a summary card. Confirm that promised dates and statuses match the physical queue.
During intake and production
Create the customer and machine before the job. Record the complaint in customer language, then add diagnosis after inspection. Update status as the job moves. Enter parts and labor before closing the job so the margin is meaningful. Keep approval evidence and testing state current. Do not mark a job Collected until the unit and payment status are reconciled with the shop’s actual handoff process.
Daily close
Open Invoices & Payments and review Outstanding balances. Verify each payment against the tender or deposit record. Check Repair Jobs for missing diagnosis, technician, approval, invoice, or testing information. Use Ask Insider for a local focus question, then inspect any referenced jobs. Download a backup at a frequency appropriate to your risk; a small shop may choose daily or at least weekly backups.
Weekly owner review
Use Financial Position to review revenue, direct parts, direct labor, gross profit, operating expenses, and operating profit. Review Job Profitability for negative or unexpectedly low-margin work. Use Receivable Aging to prioritize follow-up, Inventory & Reorder to review parts exposure, Technician Performance to compare hours and contribution, and Warranty / Comebacks to identify repeat-work patterns. Save a report snapshot before the meeting so the figures remain frozen for later printing.
Reports, exports, and printable documents
Reports provides nine business reports: Financial Position, Job Profitability, Repair Pipeline, Receivable Aging, Inventory & Reorder, Customer Directory, Machine Register, Technician Performance, and Warranty / Comebacks. Choose a report, then use Save Snapshot, Print / Save PDF, Word, or Excel. Saved snapshots preserve figures and business branding for later printing. The report footer says important totals should be verified before official use.
Raw-data exports are available for jobs, customers, machines, parts, and payments. List screens also offer Export CSV. These exports are local downloads; they do not upload to an external service. Work orders can be printed or saved as PDF from a job detail view. If a print window does not appear, allow pop-ups and retry.
Backup, restore, and device-change limitations
Use Backup & Restore to download a complete JSON archive. The archive includes the product identifier, version, schema version, export time, settings, records, audit history, and generated insights. The application records the last successful backup time locally. Keep dated copies somewhere outside the browser, and test that a copy can be found before relying on it.
Restore is a replacement operation. Choose a JSON file and select Restore backup. RepairBench validates the product type and data presence, asks for confirmation, clears the local entities, and replaces them with the selected archive. Restore the correct file; do not treat it as a merge. Make a current backup before replacing an existing workspace.
The browser-local design means there is no verified cloud sync, automatic off-device backup, shared live database, or automatic recovery after clearing browser data. A browser reset, device cleanup, profile deletion, or damaged storage can remove the workspace. Moving to another computer requires a deliberate backup and restore. Keep backup files protected because they contain customer, machine, financial, and operational records. Follow your own retention, privacy, and access policies.
Advantages and limitations
Advantages
RepairBench OS gives a small shop a focused lifecycle from customer and machine intake through collection. The status pipeline makes waiting-for-approval, waiting-for-parts, repairing, testing, and ready-for-pickup work visible. The local Insider feed turns entered records into practical prompts about margin, aging, parts, receivables, and priorities without claiming to take external action. Reports can be saved, printed, or exported with shop branding. Offline browser storage can be useful in a service bay or location with unreliable internet.
Limitations
The system depends on disciplined data entry. It does not provide cloud synchronization, external integrations, card processing, supplier ordering, customer messaging, payroll, accounting compliance, tax filing, legal warranty decisions, or automatic machine diagnosis. The Business Health score can remain Insufficient data with a new workspace, and calculated margin is only as reliable as parts, labor, and invoice fields. Browser-local storage increases the importance of backups, device security, and a clear shop procedure for who edits records.
Troubleshooting and common mistakes
The app remains on “Starting RepairBench OS.” Refresh in a current browser. If the error screen says RepairBench OS could not start, download or open a fresh copy and retry. Avoid deleting browser data before confirming that you have a backup.
The dashboard says Insufficient data. This is expected in a new workspace. Add customers, machines, and meaningful repair jobs. The score is not a diagnosis of shop health; it is a local calculation that needs records.
I cannot create a repair job. RepairBench requires at least one customer and one machine. Create the customer first, then a machine linked to that customer.
A part is shown as Reorder unexpectedly. Check On hand, Reserved, and Reorder point. Available equals on-hand minus reserved, and the Reorder state appears at or below the reorder point.
A job margin is wrong. Check Invoice total, Parts cost, Labor hours, and Internal hourly cost. Margin is based on recorded job revenue and recorded direct costs; it is not a full accounting margin.
A payment does not close the invoice. Confirm that the payment is attached to the correct invoice/job and that the amount matches the remaining balance. RepairBench records payments locally and does not verify a bank or card settlement.
A report is missing the logo. Use a PNG, JPG, or WebP file no larger than 1 MB in Settings, save the business profile, and create a new report snapshot. Previously saved snapshots preserve their earlier branding.
Restore says the file is invalid or replaces the wrong data. Use a JSON backup generated by RepairBench OS, verify the product file and date, and remember that restore replaces local records rather than merging them.
The print or PDF window does not open. Allow pop-ups for the local product, then retry. For full-color report branding, enable background graphics in the browser print dialog.
Frequently asked questions
Does RepairBench OS require sign-in or internet?
The verified product starts locally and presents an offline-ready workspace. No sign-in or internet connection is required for its local records and calculations. External platforms are not connected in the verified edition.
Is my data stored in the cloud?
No cloud storage or cloud sync is verified. Records stay in the current browser. Use Download backup to create a JSON file and store it safely outside the browser.
Can I send an estimate to a customer from the app?
No external sending behavior is verified. The app stores estimate values, approval status, approval date, and an evidence note. Use your normal phone, SMS, email, or other communication process outside the app.
Can it order a part automatically?
No. Purchase Requirements displays a calculated suggested order and supplier field. It does not create or send a purchase order.
Does Invoices & Payments process cards?
No. It records a payment method such as Card, Cash, Bank transfer, Check, or Other. It does not connect to a processor or bank.
Is Financial Position a replacement for QuickBooks or a tax ledger?
No. It is a management view with an explicit limitation that it is not certified accounting or tax advice. Verify official totals with your accounting workflow and adviser.
Can several employees use one live workspace at the same time?
A shared live database or multi-user synchronization is not verified. The records are stored in the browser. Establish a shop policy for who edits the local workspace and when backups are made.
What happens if a mower comes back under warranty?
Mark the relevant job as Warranty / comeback job and review it in Warranty / Comebacks. The product counts and displays flagged jobs but does not decide coverage or legal responsibility.
Next step for a repair shop owner
Start with one real customer, one real machine, and one current repair job. Enter the complaint, approval evidence, parts, labor, invoice, and payment only as each fact is confirmed. Then review the Owner Dashboard and save your first Financial Position or Job Profitability snapshot. If the offline model fits your shop, continue with the RepairBench OS product page and the Nexaly Planner guides hub.
For parts purchasing and reorder controls, follow the Inventory & Procurement Planner guide and the reorder-point worked example. For supplier quotes, use the VendorPulse OS guide.
CTA: Explore RepairBench OS for an offline repair-shop workflow and use this guide as the implementation checklist for your first customer, machine, job, estimate, parts record, payment, and backup.
Explore RepairBench OS
Review product screenshots, included features, download details and current purchase terms.
View RepairBench OSPrepare one repair cost worksheet before the broader shop workflow
Use the free Repair Parts & Labour Worksheet to review the parts and labour figures you enter for one job. Keep this focused estimate separate from the customer, job and inventory records described in the full RepairBench guide.
Each free planner has its own device save and JSON backup. Its records do not automatically sync with, or import into, the paid application. The free worksheet remains available without a purchase.